Saturday, March 24, 2012

Handles


I tried this new bag pattern today. It uses pre-made handles (like the kind you buy at the craft store). I think I like the way it turned out. It is basically a square of two kinds of fabric sewn together (so it makes one square with the good side of each fabric showing and backsides sewn together). The corners of the fabric get put through the loops on the bottom of the handles, and held in place with an elastic. Then put ribbon over the elastic. Gather the material on the top sides, then add a clasp to the middle. 
I know those aren't very detailed instructions, but it can you give a basic idea. 
Play with it. You can always create new things from basic ideas.

Thursday, March 22, 2012

A Bag for Me


I finally decided that I needed to make a bag for me. Looking at all these cute purses and bags made me a little jealous :) So I made this small pleated purse. The fabric is really amazing. I used two types of black and white pattern fabric for the outside and a nice teal for the inside. I used a larger version of this patten for the main body of the bag (from Pleated Pouch Tutorial at skiptomylou.org). 
Then the strap was 16" x 1 1/4" (after sewing).


I really like how it came out. I also added a pocket to the inside that could fit my cell phone or lipgloss and Tylenol. I really don't carry a lot usually, so this size was perfect. 

Soon I will show you how I make the pockets for the inside of my bags.


Wednesday, March 21, 2012

Knot Side Bag (instructions)


~ Knot Side Bag ~

I made this as a easy going beach type bag. You can alter it in many ways to make it fit your style. 
Here is how I made it.


 Here are the measurements for the main part of the bag. (see picture above)
Total bag: Width 13" Height 29" Straps: 2" x 16". I used a paper plate to make the round part.
You will need 2 pieces  of both the liner and outside fabric. 
I cut on a fold so I didn't have to sew the one side.  
Sew all the way around the outside of each set. Forming two "bags" that open at the top.

 Then I cut out two pieces from the outside fabric. They are 7" x 1 1/4".

 I sewed these in side out and then flipped them right side out. 
(If you have a crochet hook it will be helpful in turning these right side out. )

 Next I took the liner and put it around the outside fabric with both good sides facing together. 

 I pinned the little tie we made earlier in the middle of the scoop. 
Then sewed from the top and down around and up the other side. 

 I continued to do the same thing to the other side. 

 I sewed across the top of the strap on one side, down, across, and back up. 
Stopping before I sewed across the other top of the strap. 

 Then I pulled the bag right side out through the little hole in the top of the strap. 

 I then pinned and sewed the opening in the top of the strap closed. 

 Trim loose thread, tie the straps in a knot (it looks almost like a bow)

 and knot the little ties that keep the bag shut.

 All Done!

Like I said, I wanted this to be a chill beach bag. You can sewed around the edges if you want a more crisp look. Also you can replace the ties with a snap, zipper, or magnet. Use your imagination!


Tuesday, March 20, 2012

Small Handbag Tutorial


~ Small Handbag Tutorial ~

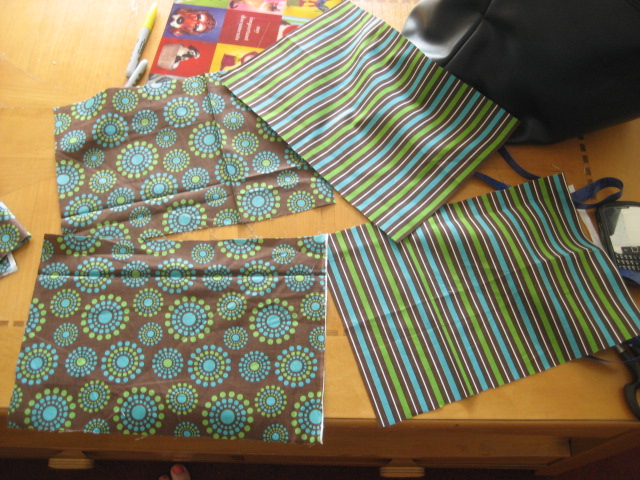
 I started with a 1/4 yd each of two fabrics that had the same colors, but were very different patterns.
I cut 2 pieces from each that were 13" x 9".

 I took a pieces of the material I was using for the main part of the bag 
and set it on top of one of the pieces I was using for the top of the bag. 
Then I folded the bottom of the material up about 3/4 of the way.

 Then I took the bottom part of the material on the bottom and folded it up to meet the top. 
Now you should have 3 layers at the top pinned together. 
(careful not the get the bottom of the main piece in there)

 After I turned the side outside right it looked like this.

 I did the same thing for the other side and then pinned them together right side in.

 I sewed around the sides and bottom, leaving the top open.

 and the puppies were watching the street sweepers.

 With the bag still inside out, I measured 2" from the corner and drew a line. I sewed just to the inside of the line so that you can't see the marker when you flip it right side out. 
Do this for both corners.
 Then I cut the corner off, about a 1/2 "from the seam.

 This is what the bottom of the bag should look like from the inside.

 Then I turned the bag right side out. (I did not put a liner in this bag, you can if you so choose)

 I took the remaining fabric from the material I used for the top portion of the bag 
and cut it down the middle length wise.

 I folded each piece in half, wrong side out, and sew along edge. Turn right side out.

 About 2 1/2" from the edge I sewed the handles. Folding the end under and sewing a square.

 I sewed mine to the inside of the top of the bag, but you can also sew them to the outside. It all depends on what kind of look you are going for. 
 After I trimmed all the loose threads, 
I sewed these buttons to the center of each square where the handles attach. 

And there you have it!


Pleats

I did my first pleated bag. It came out AMAZING. I followed a pattern I found on-line. It came out larger than I expected, but I can now down size it and play with it a little to make other bags and purses.

Check it out:


also check out my FB page:
www.facebook.com/AbintraDesigns


Sunday, March 18, 2012

Hobo Bag

So I got a special order for a larger bag that would be good to carry around all the stuff a girl needs plus diabetics medication/necessities. This is what the result was. Honestly I am quite proud. I got the inspiration from a round bottom bag I bought while I was in Guatemala. I didn't do a tutorial, but the dimensions are 25" x 16" for the main part of the bag, the section that dips is 12" up from the bottom. The circle for the round bottom was 8" in diameter. The strap was 36" x 4". I sewed the bottom of the main pannel around the circular bottom. until the two sides meet. Then sewed up the side. I did this for both colors. (I sewed a zipper pocket to the inside layer) Then I sewed the strap on the ends of the bag (the tallest parts on the edge) and the zipper into top (this is where I sewed the two layers together, as I was sewing in the zipper)

Not the best directions I know, but a basic idea.


Thursday, March 15, 2012

Lace Ruffle Shirt


~ Lace Ruffle Shirt ~

 I found this man's tank top for a $1 at Marden's and this lace material for $.87.

 This is what it looks like up close. I bought a 1/4 of a yard.

 I cut it like this (short way was horizontal) in about 3 inch strips.

 I pinned the first strip (a little smaller) right above the scoop of the neck. 

 Then about half way down that strip I pinned the next strip underneath it. 

 I continued this all the way down the front of the shirt, keeping each strip about center.
I sewed the strips in place, then snipped the loose threads and excess lace.


Here you have it!

Facebook Page

I now have a Facebook page. (exciting I know) I keep it updated with snapshots of projects I'm working on and pictures of finished bags that are for sale. It also explains how to custom order a bag. I've been a little busy fulfilling orders, so I haven't done any tutorials of the new stuff I've been making. (but I will do one soon) So check out my FB page and "LIKE" it. www.facebook.com/AbintraDesigns and keep checking back in here for more upcycles and bag tutorials. :)


---> Check out my new Spring Butterfly Tote.

Monday, March 12, 2012

Terms and Conditions Confusion

I recently read this: http: Pinterest Change Your Terms and Conditions

Normally I would shake it off and not read it (like I did the first time I "read" them) but my husband pointed out the scary parts to me. I got a little nervous (I normally don't jump on band wagons for this) so I posted in Facebook to get some level headed opinions and maybe more insight onto what this all REALLY means. I don't want to be just another American who does what everyone else is doing and thinks it can't hurt me or be wrong. Here is the conversation that we had. I hope it helps you if you're wondering the same thing quietly in your head: Conversation

Sunday, March 11, 2012

I Went Shopping!

Today I went shopping and got some AMAZING fabrics. Really cool patterns and some bright colors. Now I can start fulfilling orders (which are coming in pretty steady, can't complain) 
and starting some new projects. 


I finally made something for me. I've been wanting to make a make up bag for my upcoming trip. 
I really liked the contrast of the blue and pink here. 


I ended the day with creating this new feature that people can add to their bags. The "Necessities Pocket". Keep your debit card, favorite pen, and keys handy. 


Saturday, March 10, 2012

Scarf from an Old Vest

~ Old Vest ---> New Scarf ~

 I had this vest from Rue 21 that I used to love. 
Recently I had to clean out my closet and get rid of all the clothes that don't fit anymore.

I cut a strip from the vest 

 I sewed the edges, sewed a gathering stitch in the middle of each side, 

and added the buttons back on.

Voila!